Butterick 5679 Review

1 Mar

Image


Pattern Sizing:  I made a size small

Did it look like the photo/drawing on the pattern envelope once you were done sewing with it?

Yes, pretty much.  My fabric didn’t drape as nicely because of the hem.

Were the instructions easy to follow?

Oh yes.

What did you particularly like or dislike about the pattern?

The pattern was great.  I like that I have the option to make it a little cropped sweater or remove the ‘point’ at the bottom with very little trouble. 

Fabric Used:

A really heavy sweater knit, that I got for $2.97 at a bargain store.  It is soft and smells kinda weird, but it worked.  Using this knit was the hardest part of making this pattern.  I tried to zigzag the hem and it shrivelled to little bits, and then I folded up the ends and it was just SO thick that I couldn’t justify folding it up again to hide the lovely zig zag mess.  It would be too short if I made a really wide hem, so I’ll just hope some pressing and prehaps hand stitching (of the zigzagged end) will keep everything flat and from poking out while I wear it?  I really do love this sweater, but I feel a heavy jersey will drape better for this kind of pattern in the future.

Pattern alterations or any design changes you made:

First time ever, NONE!  I was going to lengthen it, but I didn’t want to bother.  I will probably add 1/2 an inch next time I make this, in a heavy jersey.

Would you sew it again? Would you recommend it to others?

I will sew this again, and I think it is a really simple undaunting pattern for beginners.  The other options that come with this are kind of UG (in my honest opinion), but this is pretty swell.  This particular package only came in xs, s, m, and L, so you may want to add some tweaking to get the right fit for you.

Conclusion:

I was needing a desperate break from homework and this literally took two hours from cutting pattern pieces (only four), to finishing the hem.  I love when that happens.  I can’t wait to try it again to get it to hang well and to practice my hems.  I wonder if anyones knows what I could do better to make a good hem on a thick, drapey, kind of sweater like this one.  The points literally stick straight out when you look at them from the side.  Eep.  Still wearin’ it though.

NOTE:  EEEP!  Upon second glance of the pattern line drawing, I notice that I may have made a crucial mistake with the hem on my own sweater that caused the drape to be even more ‘off”.  When folding up the hem, I noticed that the front sides (before the point) had more width tucked under.  Instead of following the fabric lines, I kind of just hemmed a straight line from the hip to the point.  I will keep an eye out for this next time, as it is much more flattering the way it was meant to be, than the sharp diagonal line of mine, from hip to centre front.  Picking the seams out of this fabric is not-gunna-happen, though.

ImageImageImageImage


Photo Dump

27 Feb

We are back from our vacation and I thought I would take a moment from writing the last of six horribly written last-minute assignments to write a blog post.  My brain feels pretty melty-melty right now, so this post will consist of a few older projects that I’ve completed and managed to get bad quality cell-phone pictures of. 


Before we left, I altered all of my bathing suit tops and bras to fit me.  It was quite an undertaking and I was on a huge time limit, but once I got going things went fairly smoothly.    You can’t really see any details of the stitching here (thank goodness), but I basically removed the hook and eye pieces on each side, ripped the seams on the top part of each elastic band up to the side boning, and cut away excess fabric, grading the elastic down to a more narrow band so that I could place the hook and eye pieces further up each band and reduce a few inches off the back.  The straps in most suits and bras came out with the stitching and had to be repositioned on the band as well.  I didn’t do any measuring here, just eyeballed it, but you can see below that the band is slightly narrower than what it really needed to be, that or I could have taken the hook piece in a centimetre more.  NBD.

Had no idea if I was supposed to stretch the elastic (if so, slightly, tonnes, no idea) as I was sewing.  I tend to think now that I should have, as the finish on some was kind of wobbly, instead of firm and tight.


Image

I also started to throw together Vogue 2237 in some leftover cheap-o lining so that I could see how it fit and decide what kind of fabric I wanted to do it in.  This is the dress foundation and I was super pleased with the fit and completely intrigued with the construction.  It was fun to try a new design that was a wee challenging.  And by challenging I mean it had a weird dart that takes four seconds to figure out.  I recommend this pattern to beginners who really want to try a slammin’ dress.  I might take my sloppy muslin below and just cover it with fashion fabric and turn it into my actual dress…

Image


For my birthday I copied this French Connection dress that I saw on a girl in Newfoundland and *needed*.  It is my favourite dress so far, in a heavy satiny slight stretch cotton with hints of grey and purple all mushed into one.  Image

I have no pictures of me wearing the dress that I can post, except for a few on my beaten-up body form.  You can’t see the curves of the dress and it’s all wrinkly because I wore it oodles, but trust me, it’s gorge.

Image

That’s my sewing helper, Kitty.

I am dress obsessed, and really wanted an opportunity to wear a large pouffy gown.  So for halloween, I decided to go as Cinderella and really went for it.  My goal was to do the basic steps of constructing a dress and just get-it-done, however sloppy!  I really wanted to make a chapel train petticoat for this dress, and after literally DAYS of overthinking it, I went for it.  It turned out okay in a really rough nobody-is-ever-going-to-see-it and it’s-just-a-halloween-costume kind of way, and really looked how I wanted.  I had no budget for actual support for the petticoat and I knew the dress would collapse without it, so I used some industrial sized plastic ties from the hardware store and inserted them into casings at the bottom.  It was a rush job and really did collapse by the end of the night (I wore it to a crowded bar and someone stepped on the dress and ripped it to shreds at the end of the night– I walked home with an exposed bum!), but it met my expectations and I feel I know how to make it work should I need to do this neatly in the future.

I basically used a heavily altered pattern for the corset top (which is the best pattern ever) and draped the remainder of my halloween fabric to it.  I didn’t have enough fabric left to do what I really wanted, but that’s life.  The corset would make an excellent foundation for lots of dress designs and I can’t wait to try draping fabric onto it in the future.

Not pictured here are puffy white sleeves, and matching white ribbon for the tie up back. 

Image

Anyways, that was a neat little thing I do called, “make a bunch of junk, photograph it poorly, and talk vaguely about it on my blog a year later”.  On to more important stuff, stuff I love MORE than sewing… my (scary) ANIMALS!


This is Lucy, she has nothing to do with sewing, but she is super cute, and she is pictured here, plotting my DEATH.  She is her daddy’s little angel but she loves some momma time, too.  Get used to her, she will be making a regular appearence on this blog.

Image

Watch out… ZOMBIE KITTY.

Image

Finally, do you ever have the strange feeling that someone, or something… is watching you?


ImageImageImageImage

Nacho can be found, usually, sitting at the end of a long hallway, staring deep into your soul and contronlling your mind (from a safe distance).  He’s lovely.


Can you tie them in a knot, can you tie them in a bow?

11 Feb

Disclaimer: If you’re a dude, you don’t need to read this.  Unless of course you’re a dude with bewbs, which is an ever increasing possibility these days.  In that case, welcome, my ‘in transition’ friend 🙂

This blog has been about 10 years in the making.  It has involved countless hours of research, thousands of dollars, and more of Oprah’s ‘ugly cries’ than I feel comfortable mentioning.  This blog, is about bewbs.  Most importantly, this blog is about MY bewbs.  Hopefully some of my experience and hard earned learnings over the past few years will help you with your own bewby questions, give you some “I’m not alone” comfort, or at the very least will make you understand why I’m so obsessed with bewbs. 

NOTE: Ugly cry is pretty much what you would imagine.  Lots of facial fluid, a red patchy nose, squinty puffy eyes, and a scared shitless boyfriend.

I GOT IT FROM MY MOMMA:

My mother gave me everything.  I’m not just talking about life opportunities here… she literally asexually reproduced me.  I have every health problem she has ever had, every unique little problem, and we are both pretty much the same individual… suffocatingly compassionate people pleasers who worry too much and have massive bewbs. 

Wait, what?

Yes.  My mother gave me the family inheritance.  A tiny ribcage and massive bewbs.  Every little girls dream, right?  Not so correct, little birds.  Massive bewbies and a little ribcage is a terrible terrible thing.  Not only because it would characterize me as “FLBP” (check out thechive.com… best site on the web, probably…), but also because it means that clothes never fit, I look larger than I really am, and because bras that fit properly, when found, sell for $100 a pop.  It’s not all bad though, I got to get away with some pretty scary ‘no makeup days’ (who’s looking up there anyways), and I was forced to learn all about sewing! 

A, B, C, as easy as… E=MC2

Let me tell you a little something about your bra.  You’re wearing the wrong size, I guaranee it.  But it goes deeper than that, much much deeper.  You’re not only wearing the wrong size… but there is no RIGHT SIZE.  *insert earth shattering noise here* What I learned from my hayday as a bra hunter, was that ‘my size’ was, depending on what I ate that day, roughly a 30H.  When I went into a non-speciality store (aka La Senza) and told the ohsohelpful counter lady that I was looking for a 30H, they would usually scoff and say “good luck”, or scoff and say “no honey, you’re not that big”.  In part they were right, because H sounds like an awfully huge cup size, right?  Who could ever be that big, RIGHT?  Well they were wrong, and here’s why…

When bra makers make bras, they do so in an silly way, with no concept of the changing human body (aka tiny girls getting giant implants).  For every inch that the band descreases, the cup also shrinks.  You would think that all A’s are A’s, and all B’s are B’s, and so forth.  But when comparing these cups, you’ll notice that the larger the band size goes, the larger the cup gets as well (more on that later).  This makes it incredibly challening for tiny ribcagers like me to find a decent sized cup, hence having to work my way into the latter part of the alphabet to get some decent boulder holders.  These ‘special’ bras almost always looked like something you couldn’t imagine anyone buying unless they specifically wanted to repulse men.  It’s as if they were engineered to be a structural fortress.  The straps were ungodly… the thickness covered much of my shoulder so forget wearing tank tops, JUST FORGET IT.  Sometimes they tried to make them sexy, by throwing on a bow or attaching some lace on the front.  But thats like trying to put lipstick on a hippo… or snooki.  It’s fooling nobody.  I’m not going to even get INTO the cost of these monstrosities… Okay, I’m going to get into it alright. 

$93 for:

-foam
-wire
-thread
-stretchy fabric
-shitty lace
-clasp
-zig zag stitching (for reals?  your factory doesn’t even have a special machine that produces a good quality stretch stitch?)
-a label that says 30H

A Strange Case of The Incredible Shrinking Bewbs

After going through the four stages of kimmy greif (denial, ugly crying, ugly crying stage 2, and booking a breast reduction surgery) I came to terms with my predicament, aka: I forced it to fit my will and decided the BEWBS HAD TO GO.

Uncharacteristically, I also decided that my health mattered and went to the gym.  Oddly enough, it turns out that when I work out, my bewbs shrink.  So I conitnued to work out, and my bewbies continued to shrink!  The clouds parted, angels sang and the sun shone down on my incredibly tiny bewbies in my all-too-large, all-too-expensive boulder holders.  Having no real support, knowledge of when my bewbs would settle on a size, nor psychological stamina to go through the “find your bra size” turmoil again, I decided to buy an AHH-BRA.  You know those infomercials that sell a stretchy sports bra for exuberant amounts of money that everyone laughs at?  Yah, I bought one of those.  It worked in the meantime, but what I learned was that I really needed to replenish my bra collection.  This time, a ‘normal’ bra size, in ‘normal’ bra shapes and colours, with… my one true dream come true… a ‘normal’ bra with skinny straps. *gasp*

I went searching and was still a 30F.  The F represented so many things to me at that point.  I gave up hope of all of my ‘normal’ bra dreams and went home, braless.

Sewing Saves the Day!

I still had my heart set on a pretty bra, despite not being in the pretty bra category (yet)!  I went to wal-mart, where I knew I could find a variety of pretty bras for uber cheap– primarily ones I wouldn’t mind ripping up, reverse engineering (I’m THAT smart) and putting back together with less fabric where it wasn’t needed.  Guess what I found in my journeys?  I found that I was actually really well suited to a 38C, minus 8 inches (DOABLE!).  I was also well suited to 34 DD’s, 36D’s, and even some 40B cups… all with varying amounts of fabric needing to be removed from the back strap.  I can’t tell you why bras are made this way, all I can tell you is if you are having trouble navigating the world of bras, are limited by money and perhaps in a geographical area without a lot of selection, go to whatever store you can find and TRY THEM ALL.  Find something that covers your bewb, and rip, cut, pin, baste and stretch stitch your way into a new bewbie revolution… welcome to Kimmy’s era of “the no size bra”. 

That’s not too grandiose… right?

For my seamstress friends, an implication:

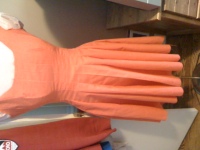
Many new patterns now offer adjustable cup sizes.  This has been a wonderful, amazing, best day ever kinda discovery for many out there not wanting to attempt their own FBA or SBA on a pattern.  But knowing what I have learned about bras, and that sometimes a C is really a B, or a D, or an FGHIJ, then what are these companies really going by when saying that “this pattern can be made into any of the following letter sizes”?  What does it mean to pick up a size 10 pattern, and make it in a D cup size?  I can tell you what it means, it means DISASTER.  I tried it most recently on a birthday dress for myself, and there I was, with a bountiful ‘F’ cup, and absolutely too much room (WAY too much room) in the front of a size 10 altered for a ‘D’ cup size.  I suggest that those of you willing to try these patterns for the first time, follow what I consider to be the first rule in sewing, and make a muslin.  You might be shocked to find that your B sized bewbies are really much larger (or smaller)  in the pattern world.

Anywhooo, what I’m really getting at, is that it seems like someone, somewhere along the way, made a decision to create a system of sizing for bewbies, and forgot to build the system to account for the person.  And after all of these years, even the pattern companies have decided to still follow this bass ackwards formula for how big our bewbs are.   

That being said, there really could be a method to all of this madness.  And there probably is.  Unfortuantely I’ve never figured it the hell out and my new theory works: a) good for me, b) better than NUTHIN’.  So please, if you DO have the answers… its about 10 years too late and I like thinking that I’ve figured out a mystery (and being right), so please, keep it to yourself you big gloater.

Stitches Be Crazy

27 Jan

Lining is the bane of my existence.  I just have to be honest and say that.  It bunches and distorts and adds cutting time and expense to a project, I friggin’ hate it.  I take every shortcut necessary when making something, and usually this means skipping the lining portion and doing facing instead.  But the problem is, facings may be simpler and quicker to do, but they are just as stupid looking, if not WORSE when finished.  Or at least, when *I* finish them.  That is one of the major problems with my coral dress (one of the MANY major problems), the finish on the neckline and straps is atrocious.  See pictures below for the hand stitched hem and icky facing on my finished coral dress that I’m probably-never-going-to-wear-because-of-all-of-the-stupid-things-that-I-don’t-like-about-it-but-find-it-too-time-consuming-to-change.  Phewph. 

Maybe I’ll take a class on facings and linings someday, or maybe I’ll just stick to making outfits that only require bias tape finishes, or handy elastic finishes like my new pink “bikimi” that I’m making for our trip in Feb.  This bikimi is risky on SEW many levels.  Number One, IT’S HOT NEON PINK.  Scandalous.  Number Two, it was $22 a meter.  Number Three, it’s my first bathing suit, and I’m making it without a pattern, on $22-a-meter fabric.  Oh, and I forgot to by bathing suit lining, so in an effort to save time (but certainly not money), I just lined it with itself… a wonderful use of expensive hot pink fabric if you ask me. 

For making this without a pattern, on my first try with bathing suit material and finishes, it is going relatively smoothly.  I LOVE THE ELASTIC FINISH.  Holy sweet baby Jesus it was SO fulfilling to sew this kind of hem.  I see many bathing suits in my future, for this reason alone.

I’ve had a test run with one finished piece held up to my bewb, and it does look kinda wonky, but livable (I have low bathing suit standards).  It’s not going to win awards by any means– it has its weird puckers and pouches, and I definitely know where I will improve next time around, but it’s still wearable, and if that’s all it is and all it will ever be, I’m okay with that.

It fit better before I put the gathers in.  I have NO idea why.  It will bug me until the END OF TIME.  Or until I test it out again.  Stay chuned for the finished product.  Or not… whatever.

99 Problems, But a Stitch Ain’t One…

23 Jan

I’ve got about a thousand hundred things to do, but all I can think about is making several hundred new bikinis and beach outfits (dresses) for a trip to meHico in 23 days (BUT WHO’S COUNTING)? Here is my most recent (almost finished) coral linen a-line dress. A-line? Did she just say a-line?! I did. Gross. But not this time… This time the pretty little flounces and a-symmetrical skirt make sewing (and wearing) an a-line dress totally worthwhile. The dress isn’t completed yet (hem to go), but my pattern review is below.

Pattern Sizing:
I cut a size 10, and aside from taking in an inch here or there on the torso, it fit well.

Did it look like the photo/drawing on the pattern envelope once you were done sewing with it?Kinda. My shoulders ended up more narrow than the picture, and the back of the dress looks waaay longer in real life. It feels like a tail. And the lines aren’t as smooth as I had imagined they would be, the transition from front to ‘tail’ is pretty severe, and I hope to alter that with the hem, once I decide on how much I should remove.

Were the instructions easy to follow?
It was okay. The shoulders were a little weird, and the description/picture for underlining the facing is ridiculous and would throw off a new sewer who hadn’t encountered it before.

What did you particularly like or dislike about the pattern?
Princess seams make getting and excellent fit uber easy.  I don’t like how severe the tail looks. 

Fabric Used:
Coral linen… Mistakenly marked to 4$ a meter!

Pattern alterations or any design changes you made:
I’m going to fix the back a little by taking in the back side seams. Pattern suggests linen but this isn’t a lined dress, so be careful.  I’m wearing it on a beach, probably with a bathing suit underneath, so I don’t care *as much* about my ladies bits showing.

Would you sew it again?
Maybe! The style isn’t that flattering on me, so it may not happen. Also, this baby is a fabric monster because of the looong princess seams and fat cuts on the bottom of each piece (which is too long anyways).

Conclusion:
This is a sweet dress, and if I can get the proportions right without screwing up the skirt, it might just be one of my new favourites! I will post a finished picture when I get to that point!